You’ll need to add networks to your account to start importing data and tracking your earnings, so if you’ve just set up account you’ll see on the Dashboard an alert that says you’ve not added any networks yet. You can click this to get started.
Once you’re signed up to AffJet you can get started by adding a new network from your “Network” tab on the menu.
Step One

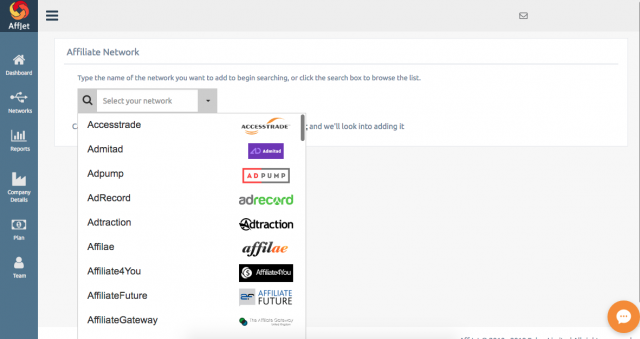
Once you are on the Networks page, you’ll see a search box. Click the arrow if you want to browse a full list of the networks we support, or start typing the network you wish to add and select it from the list. If it isn’t in this list, please contact us and we should be able to add it for you. You should see an option for this below the search box.
Step Two

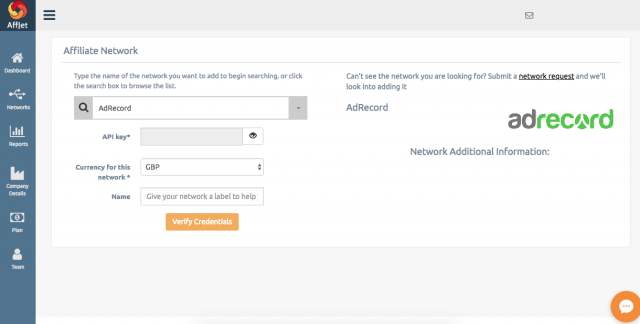
Once you have selected the network, AffJet will load in the details we require to connect to it. Any further information we have about it will be available to the right (or below the form depending on the size of your screen!).
Below the network name from the dropdown list you’ll see the details we need. This varies from network to network and may range from API keys to user IDs and passwords. You’ll need to select which currency the network reports in, as well.
Under Name you can add a label for this network. In most cases this can just be the name of the network itself but sometimes customers wish to personalise this to their company to make it easier for them.
Step Three
Once you’ve entered the correct details for the network, click “verify credentials” to check these are correct, and if so, you can click save to finish adding the network. If you have trouble verifying your credentials, please check they are accurate or contact us to see if there’s a problem.
That’s it, you’re done! You can now repeat the process to add further networks.
